A bank statement in 1C 8.3 Accounting is necessary to reflect the write-off and receipt of funds by bank transfer. It reflects information about the status of bank accounts at the current moment. Based on accounting statements, transactions on personal accounts are carried out.
Typically statements are generated daily. First, all cash receipts and debit confirmations are downloaded from the bank. Next, current payment orders are generated, which are transferred to the bank at the end of the working day.
A payment order is a document that instructs its bank to transfer a certain amount of its funds to the account of some recipient. This document does not have accounting entries.
In 1C: Accounting 3.0, payment orders are usually created on the basis of other documents, but they can also be created separately. Creation can be done from the list form of this document. To do this, in the “Bank and cash desk” section, select “Payment orders”.
In this example, we will consider creating a payment order based on the “Receipt of goods and services” document. To do this, open the already generated document you need and select the appropriate item in the “Create based on” menu.

The created document will be filled in automatically. If this does not happen, enter the missing data manually. Be sure to indicate the details of the recipient, the payer, the amount of the payment, its purpose and the VAT rate.

Uploading payment slips from 1C to the client bank
Most often, organizations upload payment orders to the bank at the end of the working day. This happens in order not to upload every document, but to upload all those accumulated during the day at once.
Let's look at how this is done in 1C: Accounting 3.0. Go to the form for the list of payment orders (“Bank and cash desk” - “Payment orders”). Click on the “Send to Bank” button.

A processing form will open in front of you, in the header of which you need to indicate the organization or account and the unloading period. At the bottom of the form, select the file into which the data will be uploaded. It will be created and filled in automatically. Check the boxes for the required payment orders and click on the “Upload” button.

To ensure the security of data exchange with the bank, a corresponding window will be displayed. Which will inform you that the file will be deleted after it is closed.

1C will most likely offer you to connect to the DirectBank service. Let us explain a little what this is. 1C:DirectBank allows you to transmit and receive data from the bank directly through 1C. This method allows you to avoid uploading documents to intermediate files, installing and launching additional programs.
To learn how to issue a payment order and debit a current account manually, watch the video:
How to unload a bank in 1C 8.3 and distribute it
Loading a bank statement into 1C is carried out using the same processing as uploading payment orders. Open the “Download Bank Statement” tab. Next, select the desired organization and the data file (which you downloaded from the client bank). After that, click on the “Download” button. All data will go from the file to 1C.

You can see how to manually reflect receipts from a buyer in 1C in this video:
On a note: If the recommendations below are not clear to you, and you need to configure it, then I recommend contacting us - Smart1C.ru. We will quickly configure the bank client for any 1C configuration.
All settings for exchange with a bank in the 1C: Accounting 8 program are placed on a single form. In order to set up the exchange of data on a bank account with the Client-Bank program, in the 1C: Accounting 8 program (rev. 3.0) perform the following steps:
For your information- for individual full-fledged work on the trading market, I recommend using the free Forex program. The program implements charts and contains economic market reviews necessary for analysis and decision-making.
In the program “1C: Accounting 8”, to reflect the payment received, the document “Receipt to the current account” with the transaction type “Payment from the buyer” is used, and to reflect the payment, the document “Write-off from the current account” is used. All these documents can be viewed by clicking on the menu tab - “Bank and cash desk” - “Bank statements”.
At this point, the client-bank settings from the Accounting 3.0 side are completed. All that remains is to work in it correctly, performing the exchange - loading/unloading.
The principle of working with a client bank comes down to the following actions:
- Open the processing “Exchange with the bank” - “Bank and cash desk” - “Bank statements” - the “More” button - “Exchange with the bank”;
- When you receive payment from the supplier, you export the file from the client bank to 1C - “Exchange with bank” - “Download bank statement” - “Download” button, the document “Receipt to the current account” automatically appears;
- If you need to pay a supplier, you create a new counterparty in the “Counterparties” directory, enter their “Bank Accounts” data, then in the program create a new document “Write-off from the current account” with the transaction type “Payment to the supplier”, post it, export this document from 1C programs - “Exchange with the bank” - “Send to the bank” - “Unload” and import into the Client Bank. Thus, you will have a 2-way exchange: 1C programs and Client-Bank.
Video - Client bank in 1C 8.3 setting up, uploading and downloading statements
In the 1C 8.3 Accounting program, you can reflect not only the movement of funds through the cash register, but also through the current account of the organization. In this article we will describe in detail all the actions that need to be performed in the program to reflect the debit and credit to the current account.
Before you begin to reflect the movement of funds on your current account, it must be indicated in the program.
Open your organization’s card in the directory of the same name and follow the “Bank Accounts” hyperlink. You will see a list of all previously entered accounts. There may be several of them, but only one will be the main one.
When creating a new bank account, you will need to indicate its number, account currency and the bank in which it is opened. You can also specify other data if desired.

Debiting from current account
Payment order
First of all, you need to create a payment order in 1C Accounting. This document is necessary to instruct the bank to transfer a certain amount of money from your account to another.
In the “Bank and cash desk” section, go to “Payment orders”.

A list of previously created documents will open in front of you. For easy searching, various selections are available here. Actually confirmed orders in this list will have the “Paid” mark, which is highlighted in green.
Click on the “Create” button.

First of all, in the created document you need to correctly indicate in 1C 8.3 the type of transaction for writing off funds. It will depend on him what details you will need to fill out. In this example, this is payment to the supplier.

The contract will also be filled in by default with the main contract of the required type. In our case, the type of contract is “With a supplier”. If, on the contrary, we sell a product and go to get money for it, then the contract should look like “With the buyer.”
If provided for in the agreement with the counterparty, then a unique payment identifier is indicated. To reflect this operation in management accounting (if this option is enabled in the settings, as in our example), indicate the DDS item.
The payment amount and VAT rate are set manually. The VAT amount, as well as the purpose of payment, will be generated automatically. The purpose of payment is indicated as the total amount, VAT sum and agreement. If necessary, this field can be supplemented or adjusted.
At the very bottom of the form there is a field to indicate the payment status. It is not advisable to adjust it manually, since it will automatically change after the fact of debiting the funds is reflected in the program.

Subsequently, all payment orders are transmitted to the bank. This can be done in printed or electronic form. Many organizations use the Client-Bank program. It allows you to exchange data with the bank remotely. You can not only instruct the bank to transfer funds from your current accounts, but also receive data on receipts to them.
Debiting from current account
To reflect the fact of debiting funds from the current account, a document of the same name is used in 1C 8.3. It can be created either automatically (upon receiving data from the bank) or manually based on a payment order.
In our case, for simplicity of the example, we chose the second option. The created write-off document was filled in automatically.

The default accounting account is 51 “Current accounts”. In our case, payment is made to the supplier, so the settlement and advance accounts are 60.01 and 60.02, respectively. Of course, this data can be changed. When posting the document, a check will be made automatically to see if our payment is an advance payment.
All other details are filled in from the payment order. We will not change anything here and will pass the document. The document postings are shown in the figure below.

Now let’s return to the list form of the “Payment order” document. As was written earlier, our document automatically changed its status to “Paid”. This can be seen in the corresponding column.

In addition, write-off documents will be displayed in . They can be found in the “Bank and Cashier” section.

Receipt to the current account
This document, like a write-off, gets into the program automatically after it is completed with the bank. In our example, we will consider entering it manually. You can create a document for receipt to a current account in 1C 8.3, as well as write-offs, from bank statements. To do this, click on the “Receipt” button.

The document is practically no different from a write-off. In this case, the type of operation will already be “Payment from the buyer”. Additionally, here you can specify the department and the invoice for payment (if one was issued). If you create a receipt document manually, then you also need to fill in the incoming number and date. When created automatically, this data will already be filled in.

After posting, the document will generate transactions that are shown in the figure below. As you can see, our payment of 80,000 rubles from Anticafe Strawberry was taken into account in the advances account. Just as with write-offs, in this case the program automatically determined this.

See also video instructions about bank statements:
In this article I will tell you how to use the functionality of bank statements and exchange with a client bank in 1C 8.3 Accounting 3.0:
- where bank documents are located in the program interface;
- how to create a new outgoing payment order;
- how to upload payment slips for payment to the client bank;
- how to download a statement from the client bank and post them;
- How to download confirmation of successful payment of outgoing payments.
The general scheme of work for a single day with statements in 1C is as follows:
- We load from the client-bank into 1C: receipts for yesterday and confirmation of yesterday's outgoing payments (+ commissions).
- We create payment orders that need to be paid today.
- (or use the Direct Bank system).
And so every day or any other period.
In the interface, the journal of bank statements is located in the “Bank and Cash Office” section:
How to create a new outgoing payment order
A payment order is a document to be sent to the bank; it can be printed using a standard bank form. Entered on the basis of the Invoice, Receipt of goods and services and other documents. Be careful document does not make any postings in accounting! The postings are made by the next document in the chain, 1C 8.3 - “Write-off from the current account”.
To create a new document, go to the “Payment orders” journal in the above section and click the “Create” button. A new document form will open.
The first thing you need to start with is choosing the type of operation. The choice of future analytics depends on this:

Get 267 video lessons on 1C for free:
For example, select “Payment to supplier”. Among the required fields for this type of payment:
- Organization and organization account are the details of our organization.
- Recipient, agreement and invoice - details of our counterparty-recipient.
- Amount, VAT rate, purpose of payment.
After filling out all the fields, check that the details are correct.
Our video about bank statements in 1C:
Uploading payment orders from 1C to the client bank
The next stage is transferring data on new payments to the bank. Usually in organizations it looks like this: throughout the day, accountants create a lot of documents, and at a certain time the responsible person uploads payments into the banking program. Uploading occurs through a special file - 1c_to_kl.txt.
To upload, go to the payment order journal and click the “Upload” button. A special processing will open in which you need to specify the Organization and its account. Then indicate the dates for which you need to upload, and where to save the resulting file 1c_to_kl.txt:

Click “Upload”, we get a file with approximately the following content:

It needs to be loaded into the client bank.
Our video on setting up, loading and unloading payment cards:
Almost any bank client supports uploading a file in the KL_TO_1C.txt format. It contains all data on incoming and outgoing payments for the selected period. To download it, go to the “Bank Statements” journal and click the “Download” button.
In the processing that opens, select the organization, its account and the location of the file (which you downloaded from the client bank). Click "Update from statement":

We will see a list of documents 1C 8.3 “receipts to the current account” and “debits from the current account”: both incoming and outgoing (including for). After checking, just click the “Download” button - the system will automatically generate the necessary documents according to the list with the necessary accounting entries.
- If the system does not find the TIN and KPP in the 1C directory, it will create a new one. Be careful, there may be a counterparty in the database, but with different details.
- If you use, be sure to fill them out in the list.
- If the created documents do not contain accounting accounts, fill them in the information register “Accounts for settlements with counterparties”. They can be set both for the counterparty or agreement, and for all documents.
How to set up loading of bank statements in 1C, as well as uploading, and how to make a statement in 1C 8.3?
Let's start by creating a payment order:
- Based on the document of receipt of goods and services, invoices, etc.;
- Through the creation of a new payment order/PP.
In the “Bank and cash desk – PP” block.
Fig.1
A journal with payments will appear in the window that opens, where you can, by setting up the appropriate selection, filter the necessary documents, for example, display a list by a specific organization, bank account, date or counterparty.

Fig.2
Filling out the main fields here begins with the “Type of operation”. Depending on what is selected, the structure of the document will change, as well as the required analytical fields.
Having filled out the basics, we open and close the document with the “Post and Close” button.

Fig.3
The payment system does not make any transactions in 1C 8.3; they are generated by “Write-off from account”, which can also be created based on the payment slip we generated, or manually, by creating a new write-off.
Creating a receipt/debit from a current account
The first option is to create it manually through the “Bank and cash desk – Bank statements” block.
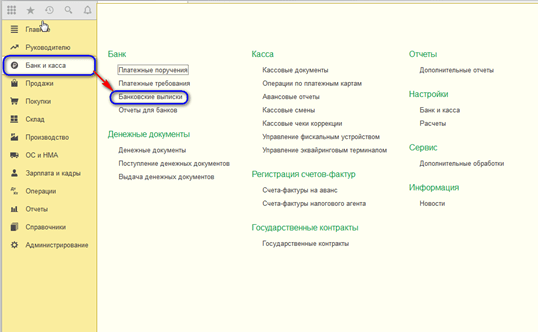
Fig.4
The journal that appears shows all receipts and debits from the account. To make it more convenient to work with it, you can set filters:

Fig.5
To make the document we need, click on “Receipt” or “Write-off”, depending on what we need.
Fig.6
Here we fill out the main fields in the same way as filling out a payment order:

Fig.7
After filling out all the fields, check the correctness of the filled in details and click “Record-Post”.
In the documents “Receipt to the current account” and “Write off from the current account” we look at the transactions and check the correctness of their display through the “DtKt” button. The transactions will be displayed in the “Document Movements” window that opens.

Fig.8
After checking the correctness of the transactions, click “Post and close”.

Fig.9
The second way to create “Receipt to current account” and “Write off from current account” by uploading a bank statement
Let's move on to sending documents to the bank. While in the “Bank Statements” journal, click “MORE—Exchange with the bank.”

Fig.10
In the “Exchange with Bank” window that opens, to upload documents to the client bank, select the “Send to Bank” tab:
- We select the company from which we will upload documents;
- We indicate the bank account;
- We select the period for which we need to download the bank statement;
- Select the location to upload the file.

Fig.11
The tabular part here will be filled with bills that need to be paid.
Next to each payment card that we want to pay, we put a “Flag” and click on the “Upload” button. This will open the “Check for virus attacks” window, where we click “Check”.

Fig.12
A file will be generated in the “1c_to_kl.txt” format, which must be uploaded to the client bank.
In the “Exchange with Bank” window, you can view a report on uploaded payment documents, for which click “Upload Report”. The resulting report will display the payments that were uploaded to a file for downloading to the “client bank”. It can be saved in any format or printed.

Fig.13
Loading an extract in 1C 8.3
The first option is from the “Download bank statement” tab.

Fig.14
We indicate:
- Organization
- Bank account
- Download file
Click on the “Update from statement” button.
The tabular part will be filled with data from the file, while the lines highlighted in red mean that the program did not find in the directories the data (registration account, counterparty by matching TIN and checkpoint) to which receipts or write-offs from the account should be distributed. Correctly distributed documents are highlighted in black.
Next to each document that we want to upload, we put a “Flag”. At the bottom of the window, information will be given on the number of documents to be loaded, as well as “Total Receipts/Debits for the amount”. Click “Download”.
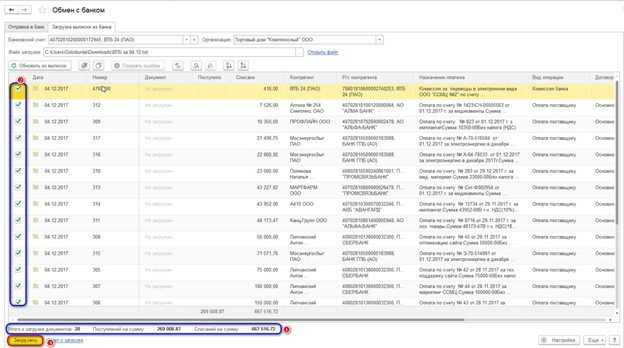
Fig.15
If the bank statement in 1C 8.3 was partially downloaded, the system will display this information in the tabular part of the “Exchange with Bank” window. Documents that have not been downloaded will be displayed with the value “Not downloaded” in the “Document” column; for downloaded documents, the information “Debit from the current account or Receipt to the current account”, the number and date assigned to it will be displayed.

Fig.16
You can view a report on downloaded documents. To do this, click on the “Download Report” button.

Fig.17
Let's consider the second option, how to load statements into 1C 8.3.
In the “Bank Statements” journal, click “Download”.

Fig.18
Here we look for the extract download file and click “Open”.

Fig.19
The program will automatically download and post documents from the statement and display the number of downloaded documents, as well as the total receipt amount and the total write-off amount.

Fig.20
Documents in the Bank Statement journal, marked with a green flag, are posted and posted.

Fig.21
You will need to post and post the statement yourself if it is not marked with a green checkmark: open the document that has not been posted, fill in the basic required fields for posting the document, check the correctness of the filled in details, click on the “Post” button, then “Post and close”.

Fig.22
The document was processed and distributed.
If in the bank statement journal you need to display the initial balances at the beginning and end of the day, as well as the total receipts and write-offs for a given date, click “MORE – Show/Hide totals”.

Fig.23
At the bottom of the journal, the initial balances at the beginning and end of the day will be displayed, as well as the total receipts and write-offs as of the date.


Formation of the wage fund: formula, calculation rules
General requirements for filling out the form
Incentives influence people's behavior in Japan, where land is a scarce resource.
Innovative path of development of Russia Transition to an innovative path of economic development
Russian accounting standards and their connection with international financial reporting standards Federal accounting standards establish